Wednesday, December 21, 2016

Choco chip cookies... bestest ever!!

yes I made Cookies and they turn out to be the bestest i have ever had. Its easy!! you just need to know the right consistency and you will have an awesome homemade cookies for your children whenever you want!


So collect following ingredients and mix them well up and you are good to go(read it EAT)

~ Ingredients

  • 3/4 cup sugar
  • 1 1/2 cups flour
  • 3/4 teaspoon baking soda
  • 1 teaspoon vanilla essence
  • 1 tablespoon water (room temperature)
  • 1 1/2 tablespoons vegetable oil
  • 1/2 cup butter (melted)
  • 1 teaspoon drinking soda (you will find this only in my recipes...i guess...it just adds the " fluff" to the cake or a cookie...here I am talking about the liquid soda, packed in bottles)
  • 1/2 cup chocolate chips
~ Method
Step1: Preheat the oven at 180C (whatever temp works for your oven, it should not be preheated at very high temp)
Step2: Melt the butter and pour it in a bowl. Add sugar to it. Mix it well till the sugar dissolves completely and the mixture has a fluffy texture. 
Step 3: Add water,vanilla essence and oil to the mixture.
Step 4: Add flour to it. Mix everything well.Add baking soda and drinking soda to it. 
Make sure the texture should be such that the batter should not stick to the utensil nor should it be very crumbly. It should be good enough like a dough(reminds me of play dough) from which you can small balls.
 You can add more oil/butter according to the crumbliness of the dough.
Step 5: Make small balls with hands or put 2 scoops of dough on the tray directly. I put 2-3 cookie in a row as I want to give the cookie some space to expand.
Step 6 : Sprinkle Choco chips over the top of the cookies, then put the tray in the oven. You have bake the cookies for 10-15min according to your home oven's temperature( i prefer at 180 degC)


Step 7: You can check if cookie is done by placing a flat spoon/spatula under a cookie and check if the base has turned brown. (It should not be very dark brown or very light). If it is brown switch off the oven, take out the cookies and keep them slowly one by one on the wire rack. Let them cool down.

cookies on the rack


Voila amazing cookies are ready!!


You can add chocolate powder to the cookies to make awesome chocolate cookies!

#ChocolateChipCookieRecipe,#VegetarianRecipe, #QuickVegetarianRecipe, #HomeCooking, #NewMom, #NewMother, #NouvelleMaman, #EgglessCookie, #VegRecipe, #HomeCookRecipe, #CookieRecipe, #BestForKids, #MothersParadise, #BlogForMoms, #BestChocoChipRecipe, #YummiestCookie , #BestCookieRecipe


Thursday, August 4, 2016

TV or I pad for my lil one? ?

After analysing for last one year i finally have been able to make a decision to choose an Ipad over TV.
Its very important for every parent to know what his/her child is watching during the free time or mealtime on TV or Ipad.(I am talking strictly for children less than 12years). Some parents might think I am over protecting the child or doing the helicopter parenting (the latest fad in the parenting world....Uff !!). Let me explain myself.

CC, Flickr.com, by Yoshihide Nomura

I let my child, 3years of age, watch ipad sometimes when she way too cranky or during the mealtime(a bad habit i know but fussy eater has to eat something during the day :(  ) . I always prefer her watching an Ipad over TV .

My reasons:-
1. I get to choose the content on Ipad. I download educational apps and games which helps her to use brain and is entertaining at the same time.
2. There is no abusive language or violence she is learning during the Ipad session whereas on TV a child can scroll and watch any channel by mistake and if not the channel, there are even a lot cartoons which are not teaching good things. Cartoons like Doraemon or ShinChan on nickelodeon is a bad example of cartoon.
3. I can switch on Ipad anytime and anywhere to grab her attention.
4. I can make her forget to watch Ipad coz I keep it in a drawer which is not reachable to her whereas the TV is right there in the drawing room where the child can keep the track of time and can ask to watch a scheduled programme.

Due to all this, even when we(parents) watch TV alot of time my baby is interested in playing her game(in the same room) rather than sitting and watching TV with us.

If you think I am right or you think the same as a mother, please comment!

Happy mommying!

#IpadOrTv, #IpadForKids, #NoTvForKids, #TechDays, #NewMom, #NewMother, #NouvelleMaman, #BestForKids, #MothersParadise, #BlogForMoms

Wednesday, June 29, 2016

Indian samosas ~ anyone?

I made these Indian samosas ,which I love, for my kiddo and she absolutely loves it as well.
It's an easy but a loads of calorie snack, which I don't mind giving to my 3 year old baby sometimes.

Cooking time~ 15-20 min 


Ingredients ~
Refined flour - 4 tbsp
Cooking oil - 1 cup  (for frying)
Water to kneed the dough
Salt to taste.
Potato 1/2

Method~
Potato filling
Step 1- Boil potatoes
Step 2- Take a potato and cut them into small pieces.
Step 3- Take a pan and put it on the burner. Put 2 tsp of oil, add a 5-6 cumin seeds. Let them roast for a few seconds.Then add cut potatoes and add salt to it.
Step 4- Let it cook on slow flame till potatoes turn golden brown.

Outer crust
Step 1- Put the flour in the bowl. Add 3 tsp oil. Try and kneed the dough. It should look crumbly by now. Add a pinch of salt(1/10 tsp) and (1/10 tsp) baking soda.
Step2- Then slowly add a bit of water, only enough to make the dough smooth.
Leave it covered( with a cloth) for 15minutes  till then check your potatoes.

Final samosas
Step 1- Make 2 small balls of the dough.
Step 2- Roll it with a rolling pin to make it a circle. Cut the circle into half with the knife, like a D. 
Step 3- Mash the cooked potatoes in a bowl.
Step 4- Put a spoon of mashed potatoes on the D, small portion only so that you can fold the dough and not let potatoes come out.
Step 5 - Fold the D in such a way that you make a triangle by making sure that the potatoes remain inside. :)
Step 6- You have to seal the sides  by pinching the sides together gently and no potatoes should come out.
Step 7- Put a frying pan on the burner and put 5-6tbsp of oil in it. Heat the oil. Put the triangle and let it fry until it turns golden brown.

Happy mommying!!

#SamosaRecipe,#VegetarianRecipe, #QuickVegetarianRecipe, #HomeCooking, #NewMom, #NewMother, #NouvelleMaman, #VegSamosa, #VegRecipe, #PotatoRecipe, #IndianRecipe, #BestForKids, #MothersParadise, #BlogForMoms

home made Icetea in minutes!

In 5 minutes you get an amazingly refreshing and a healthy drink - homemade Icetea


Serves 4-5
Ingredients -
2 lemons 
1 tea bag 
5 glass of water
Sugar - 1.5 spoon for every glass
mint leaves - a few

Method- 
Step 1- Put one glass of water in a microwavable glass and heat it for a minute. 
Step 2- Take out the glass and put the tea bag in the hot water and let it remain in the water for 5 minutes.
Step 3- In the meanwhile take a jar, add 4 glass of water. Add sugar and squeeze lemon to it.Stir it well so that the sugar dissolves in water.
Step 4- Add the teabag water to it. Put it in the fridge to chill.
Put some mint leaves while serving.
And its READY in no time!!


happy mommying!

#HomeMadeRecipe,#VegetarianRecipe, #QuickDrinkRecipe, #5MinutesCooking, #NewMom, #NewMother, #NouvelleMaman,#QuickAndEasyDrink, #IceTea, #NoFruitDrinkRecipe , #DrinkWithoutPreservatives, #DrinkNoPreservatives, #HomeMadeDrink, #HealthyDrink, #HomeMadeIcetea, #BestForKids, #MothersParadise, #BlogForMoms

Friday, June 24, 2016

Fresh Aam Panna - Cool your summers!!

With these 3 ingredients you can overcome the summer heat in minutes. Its healthy, tasty and nutritious...yes I am talking about Aam Panna( pronunciation - Aaam Pun~naa ).


Serves 4-5 person
Ingredients ~
3-4 Unripe mango (green mango)
1.5 cup sugar
1 big cup Mint leaves(without stem) (in cup coz everyone wont have the weight measuring device)
2 tsp black salt
2 tsp cumins

Method ~
Step 1- Peel the green mangoes and put them in a pressure cooker. Add 1 bowl of water and let it cook. After 2-3 whistles close the burner and let it cool.

Step 2- Meanwhile, roast cumins on a pan, roast till they are light brown in color. Let it cool and then crush them using a rolling pin and keep them aside in a bowl.
Step 3- Pluck the mint leaves from its stem and put leaves in a big bowl of water to rinse off its dirt. Let it stay in water for 15-20 min. Take the clean leaves out of water and put them in a blender.
Step 4- Open the cooker lid and take out the mangoes. Squeeze the pulp out and put the pulp in the blender with mint leaves.
Step 5 - Add sugar to the blender mixture.and blend it.
Step 6- Add salt and crushed cumin seeds. Add 4 cups of water. Mix it with a spoon.
You can add more salt or sugar according to your taste.

And your summer drink is ready!
Its a good source of Vitamin A, Vitamin C and B6

Happy mommying!


#HomeMadeRecipe,#VegetarianRecipe, #QuickDrinkRecipe, #15MinutesCooking, #NewMom, #NewMother, #NouvelleMaman,#QuickAndEasyDrink, #AamPanna, #MangoFruitDrink #VegetarianFruitRecipe , #DrinkWithoutPreservatives, #DrinkNoPreservatives, #HomeMadeDrink, #HealthyDrink, #BestForKids, #MothersParadise, #BlogForMoms

Thursday, June 2, 2016

Pigeon- feeding dish

I had ordered this online and I was actually amazed by its usefulness and its simplicity.

The bowl has two sections, one for food and the second one for grinding the food. The spoon is latched on to the cover thus you wont lose the spoon easily. It comes with a small spoon and small section for food thus its ideal for babies who have just started the food( 8-10month+ baby food).
Photo credit: pigeon-in.com


My take- 9/10
Cost- Affordable
Food Type- Food which are easily mashable, like fruits or boiled veges etc
Age- 9month+
Usefulness- Very handy
Availability - mostly online

Happy Mommying!!


#NewMom, #Newmother, #NouvelleMaman , #BabyProductReview , #PigeonFeedingDishReview , #BabyFeedingDishReview, #WeaningOffProducts, #PigeonBabyProducts, #PigeonProducts, #WhileWeaningOff

Tuesday, May 31, 2016

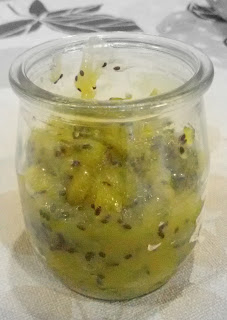
Kiwi jam in 5 min...no preservatives!!

A big DIY this summer - is to make jam with any fruit you want for your little one. Any fruit which gets overripe before you can eat, make a jam of it.  (except banana and papaya I guess)
I tried with two kiwis and it turned out to be the best experiment of this season. I took one overripe kiwi and one fresh to maintain the balance of tang. I chose kiwi as my daughter loves tangy jam.


Following recipe is to be consumed within 3-4 days as I have not used any preservatives.

Ingredients -
2 kiwis
1/2 lemon (small size)
1/2 tbsp sugar
Cooking time - 5min

Method -
Step 1 - Peel the kiwi and chop it into pieces and put in a bowl. Now grind the kiwi with the help of a fork.
Step 2 - Put the non stick pan on the flame. Add kiwi to the pan and keep the flame on slow. 
Step 3 - Try and stir after every 15-20 sec. When the kiwis own water evaporates a little, add sugar to it. Make sure you are stirring it regularly now as after adding sugar to any food, it sticks to the pan quickly.
Step 4 - When you see the water is almost evaporated, squeeze the lemon to it and put off the flame.
Step 5 - Put it in the jar.
Yay!!!!! A delicious jam is ready in no time.


#HomeMadeJamRecipe,#JamVegetarianRecipe, #QuickJamRecipe, #5MinutesCooking, #NewMom, #NewMother, #NouvelleMaman, #HowToMakeJamAtHome,#QuickAndEasyJam, #KiwiJam, #AnyFruitJam #VegetarianRecipe , #JamWithoutPreservatives, #JamNoPreservatives, #BestForKids, #MothersParadise, #BlogForMoms

Friday, May 13, 2016

5 min snack- loaded nachos

In 5min you get a yummy, tummy filling snack.


Total Time- 5-10min

Ingredients:-
3 Tomatoes
2 Capsicum
2 Onions
1 Pack of Nachos
2 cubes of cheese
Few Olives
Oregano flakes
1/2 tsp Salt

Method:-
 Step1 - Cut and chop onions, tomatoes and capsicums.
              Put in a bowl in which you want to serve.Add a bit of salt.
 Step2 - Open the pack of nachos and add nachos to the bowl. Spread nachos in such a way that all the veggies are covered.
 Step3 - Grate the cheese on it
 Step4 - Sprinkle some Oregano and Olives and Jalapenos on top of it.
 Step5 - Put it in the oven till the cheese melts.

voilà! You have an awesome meal in minutes. Your child will love it.

happy mommying!! 


#LoadedNachosRecipe,#NachosVegetarianRecipe, #QuickNachosRecipe, #MicrowaveCOoking, #NewMom, #NewMother, #NouvelleMaman, #VegNachos, #VegetarianRecipe 
#BestForKids, #MothersParadise, #BlogForMoms

Arrabiata - penne pasta- Low Cal

An easy recipe to take care of your pasta cravings. Its fun and a quick method to fulfill your child's demand. You don't need to add extra cheese to make it tasty. It has very less calories as i am using very less oil and 1 cube of cheese only. :)


Cooking Time:- 30min

Ingredients :-
A bowl of uncooked pasta (take wheat pasta for lesser calories)
4 tomatoes
1 cube of cheese
Garlic/ garlic paste
Ginger / ginger paste
2-3 tsp Mayonnaise
A few olives ( I have used black )
3-4 tbsp Vegetable oil
1 capsicum green
2 onions
2-3 baby corn
1/2 carrot

Method -
1.  Gravy
    A. Grind tomatoes till its almost a puree.
   B. Put the pan on the stove and the add  2-3 tbsp of oil to the pan and add crushed garlic and ginger to it. Add tomato puree you have made. Let it cook till the water evaporates. Add a dollop of mayonnaise and stir for a minute. Turn off the gas and put it aside.

2. Penne.
   A. Add water to another pan and let it boil.
   B. Add a teaspoon of cooking oil and salt. Then add penne to the boiling water.
   C. Cover the pan and and let the pasta boil.
   D. Check pasta if its done(take out one piece of pasta and cut it with a fork. See if the inner layer of pasta looks cooked) and turn off the gas.
   E. Take out pasta by straining all the water. Then wash the pasta under cold water. And grease it with some oil on it using a brush or hands. Then pasta doesn't stick to each other.
   Put it aside.

3. Final mixture.
   A. Turn on the gas and put another pan. Add some oil to it.
   B.  Sauté chopped onion till golden brown and add and sauté capsicum, carrot and baby corn as well. Add salt according to taste.
   C. Add penne and gravy to the vegetables. Don't overcook, make sure penne is just heated.
   D. Turn off the gas. Grate some cheese on the top.
   E. Sprinkle some cut olives and a dash of oregano and black pepper.

Voila! Your penne pasta is ready.
If you try and like it, please leave a comment below.

Happy mommying!


#PastaArrabiataRecipe, #RedSaucePasta, #VegPasta, #PastaCooking, #NewMom, #NewMother, #NouvelleMaman, #PastaEasyRecipe, #LowCaloriePasta, #VegPasta, #VegetarianRecipe, #VegetarianPasta

Monday, April 18, 2016

iPad during the meal time- let's make it a learning time

My 2 year could tell different shapes,  colours,  a-z and 1-10 before she was 18months. But all good things come at a cost , here it was my daughters mealtime in front of ipad :(
So I recommend that instead of making your child watch silly cartoons on TV,  on I-pad make them watch some constructive or informative videos. There are several apps which are useful, very informative and interesting as well. They can keep your child busy for hours. Though I recommend only 1-2 hour in a day which should be reduced eventually. I made sure my child is off this bad habit after she joined school(2+ years).

Here are my best picked apps on any tab and videos on YouTube.

List of videos online :-
CC, By Steve Paine, Flickr.com

1. Busy beavers. They teach colors, numbers and shapes etc really well. Its fun and have loads of interesting educative videos.
2. Chuchu TV. They have all the poems possible and with good teachings as well.Good animation with catchy tunes.
3. Little baby bum. Poems in British accent and very sweet and very soft voice. I love the soft music they play on.

List of best apps(educative) on my iPad :-
1. Phone4kids. This app gives a lot of options freely also. They have a lot interactive options which are educative for your child like drawing, directions, seasons etc.
2. KidloLand. Interactive app where a child can touch for various sounds and animation and along side the learning of nursery rhymes.
3.ABCSong.  Another app for painting, matching  and various other activities through which your child can learn A-Apple and B-Ball etc.

I know many mothers will say how can you let your child watch iPad during the mealtime but I had no option for a fussy eater. My baby takes 1+ hour to finish her meal. So I make sure I give her toys and tell her story when I start the meal and the last 15 minutes of iPad.
Sadly one cant deprive the child with the technology we use everyday. But everything should be given in  moderation.

Happy mommying!!


#NewMom, #newMother, #NouvelleMaman, #IpadDuringMeal, #GoodThingsIpad, #NoIpad, #IpadGoodOrBad, #MakeABadHabitGood

Sunday, April 10, 2016

2 minutes microwave chocolate cake

This is an insanely easy and a quick fixture to any chocolate cake craving in just 2 minutes☺.


Recipe
Preparation Time- 15min (collecting to mixing all the ingredients)
Cooking time - 2-3 min

Maida/All purpose Flour    -    3 tbsp
Coco Powder                    -   2 tbsp
Sugar( prefer powdered)    -   3 tbsp 
Salt                                    -   1/8 tsp
Cooking Oil                       -    3 tbsp
Milk                                  -    3 tbsp
Vanilla Essence                  -   1/4 tsp
Baking Soda                      -   1/8 tsp

Method-

Step1. Put Maida, Coco Powder,Sugar and Salt in the cup you want to prepare your cake in.

Step2. Add liquids now:- Oil, Milk and Vanilla Essence and stir till there are no lumps.
          TIP: Do not add liquids at one go, add them slowly one by one.

Step3. Add Baking Soda to the smoothed mixture.
        TIP: Always add soda at the end as its the raising agent in the cake.

Step4. Dash a handful of chocochips if you want it more chocolaty. 

Step5. Put the mug in the microwave for just 2 minutes. Make sure your microwave temperature is not more than 600-700W. As soon as time finishes check the cake with a knife/toothpick. The cake should not stick to the toothpick.( like the middle pic in above collage)

You are DONE!!!

For Garnishing:-
Left pic:- Add a scoop of vanilla ice-cream on the top of the cake, a drop of mixed fruit jam or a cherry, two chocolate biscuits on the side.
Right pic:- Add a scoop of chocolate ice-cream on the top of the cake, add a few slices of freshly cut kiwi or strawberry. YUM!!

ennnnnnnnnjoyyyy :)


Happy mommying!

#2MinuteMicrowaveCake, #EgglessMicrowaveCake, #EgglessChocolateCake, #MicrowaveCOoking, #NewMom, #NewMother, #NouvelleMaman, #CakeInMinutes, 


Sunday, March 13, 2016

A solution to Menstrual cramps

Since teenage i have faced this problem : Cramps!! Oh it has always been really painful and I always ended up curling myself up in the corner of the bed. Until few simple home remedies helped me to cope up and I could again feel free from the pain.
One can try anything from the following points and test and see what really helps you.

1. Walking. We all lead and very sedentary lifestyle with hardly any exercise. So a simple walk everyday can actually help you to avoid the pain. So get up and get going girl. I will not say this includes your household chores but a proper 15-20 min walk. 
2. Antacid. I have it in the morning and the whole day goes as if there is nothing different about the day. But please ask your doctor before taking one. 
3. Hot water bottle. Place it where you are having an ache. 
4. Turmeric. Add half a spoon of turmeric to the milk and have the hot/ lukewarm milk. Indians swear it as a solution to any body ache.

Please be active and half of your health problems will be solved. :)

happy mommying!

#GirlProblem, #SolutionToCramps, #MenstrualCyclePain, #PainDuringMenstrualCycle, #HowToAvoidCramps, #NewMom, #NewMother


Thursday, March 10, 2016

Anal Fissure/ Piles after delivery

Indians have a very old saying that after delivery the mother should rest for 40 days before getting up and doing the household chores and the mother should eat light food during this time(easy to digest)  like rice and lentil cooked together called khichdi  and broken wheat called daliya.
After my delivery I did not believe in everything what these oldies said and I later I faced the consequences.
My gynaecologist told me that it has been scientifically proven that it takes 40 days for uterus to return back to its normal size so the point one was right.
I always had a healthy life and no bowel problem and after delivery I ate as everyone ate. One the biggest consequence I got anal fissure. It was because of the kind of food I ate. The stool hardens if you eat more of refined flour than the wheat flour and eat less of fibre.  I still get it whenever I eat out and eat things like pizza which has less fibre.

Solution to fissure  I found out after an year of problem  :-
1. Use haemorrhoidal cream with a glove on the affected area. As a glove is smoother than the finger tip it pains less. Use it  everyday till the pain subsides.
2. Use the cream specially at night as most people go for pots early in the morning, cream is at the surface for maximum time to help the cut heal.
3. Take laxative at night.
4. Eat loads of fibre.  Change your diet which comprises more of fruits and veggies than processed food.
5. Exercise, everyday but not during the pain.
Point 4 and 5 also helps in preventing the fissure to occur.
Take care new moms. 


Happy mommying

#NewMom, #NewMother, #NouvelleMaman, #FissureAfterDelivery , #HowToAvoidFissure, #pilesAfterDelivery , #BloodWhenShitting 

Wednesday, March 9, 2016

Potty training

One of the biggest and and the most important part of upbringing a child also includes her potty training. A child is able to feel and tell about the genital sensations after 18 months- 20 months. So one can totally remove the diaper after that as this is best time to make sure that your baby is toilet trained.
When to start the training?
- once the baby has started walking.
- able to speak
-  summers (the best time as the child will soil less clothes and and does not need to be covered up all the time, unlike winters)

How to start the training?
- Step1: Start by taking your baby after every 2hours to the loo to the wash basin or the pot. Do the ssssssss sound or start the tap to let the water flow, these sounds help in making the baby pee. hold the baby in U-shape and let her do her thing.
- Step 2: Buy a potty chair. Its of right height where any child loves to sit and encourage the baby to sit there whenever she/he wishes to pee.Another advantage is that its mobile, keep it anywhere. You can also give any book to read while sitting there.
-Step3: Toilet seat. initially you have to hold the baby once they are independent to climb up and hold the seat and pee, its easier for the parent as no one needs to clean but rather just flush.

Tips for quicker learning?
- Demonstrate how her/his elders don't wear diapers and go to loo every time they need to pee. Moms can take the child along with her to the loo and just show how its done (without doing the actual thing :)). Or can show how the elder sibling does it.
- NEVER scold the child if she accidentally pees or poops in her pants.
- Avoid travelling for a week while you are potty training.
- Remove the diaper completely during the day only then the child will understand what soiling the pants means and why going to the loo is important.( this should be done when you are at home for minimum 5-6days at home and after a month or so you have start the training.)
- Night wetting goes in later age so even if the child is potty trained you should still use the diaper at night.
- There are various youtube video showing kids/ toys doing it.

Whats the right age?
According to me 18month+ is the right age as the child is able to tell and feel properly and speak her mind too.

PLEASE DON'T stress if your baby has learnt a month later than your friend's baby. Every child is different and learns at her own pace. Be ready to clean your floor a bit as accidents(poop in pants) do happen and never scold the baby for it.


Happy Mommying!

#NewMom, #NewMother, #NouvelleMaman, #माँ , #PottyTraining, #HowToPottyTrain, 

Sunday, February 28, 2016

6 signs of having a baby boy

There are many who can predict the baby's  gender really well with the help of different signs/features a preggers has. But I found a better way to predict which is totally on the nature of a husband. Some might don't know that a woman's egg has chromosomes XX whereas male's sperm has both X and Y chromosomes so if X-Y meet, a boy is born and if X-X meet then a girl is born, according to me the X and Y chromosomes ( required to have a baby boy) meet as per the husband's nature.  So your childs gender is dependent on the husband's trait.

CC, By Filter Collective, at Flickr


You need to find these traits in your husband or anyone to predict. My list is:-
1. If the dad is left brained ( meaning your husband is more logical, can easily solve puzzles )
2. If you dictate the husband's wardrobe  (deciding his clothes)
3. In the end you win the arguments even if he is right
4. If husband gets totally engrossed in TV instead of listening to you but also let's you watch your serial when you want.
5. If he spends more time at your parents house than his own
6. Athletic.

In short if your husband listens to you for clothes , shopping, movie etc then you will have a baby boy. You can't change anything because it's his nature.
Please notice these traits amongst yourself and others and please let me know by commenting here.
Thanks

Happy Momying!!


#NewMom, #NewMother, #NouvelleMaman, #FatherAndSon, #BabyBoy, #HowToPredictGender, #GenderPrediction, #BabyBoyOrGirl

Thursday, February 11, 2016

A child is father's responsibility too.

I generally see people expect only moms to do everything for a baby.
I went to a wedding recently(destination wedding) so we had our 2 and a half year old all to us as in no grandparents or nanny helping us. So from getting ready myself and my baby ready to reaching the venue on time was pretty hectic for me. And I realised it then that my husband only had to conveniently wear the suit and go while I was all worked up. Phew! And photos come out as disastrous as can be.
Even in the parks I see mostly moms  getting the child for the game or running behind them but very few dads.
And people generally argue that they " dads" are earning the money for the family what else a mom-at-home is doing.

So I want to argue on the behalf of all the mom-at-home if the whole day the husband is working then your wife at home is also cleaning the home, utensils,  cooking,feeding the baby, running after the baby , bathing the baby and handling everybody's clothes and the list goes on..... So if the husband says I am tired after work and can't hold the baby or run after her then please see the list of things your wife "a mom" has done. And then decide who is running the house.

So I request all the dads that only your wife didn't want the baby alone but you too so help her with the in the evenings and please don't give the stupid reason "dear  I have worked all day and I am too tired ". Your involvement with the kid is equally valuable as of a mother.

Happy mommying!

#NewMom,#NewMother, #NouvelleMaman, #GoodFather,  #howToBringUpAChild,  #GoodParenting,

Sunday, February 7, 2016

Baby food: On the go

I have always felt the responsibility of making my baby eat before we leave home and pack something extra too for "mini me"- fussy eater. But my luck runs out and my patience too, from getting my baby ready to me getting ready as well as the home cooked food for her makes me go crazy and everything comes out on dear husband  by the end of the party :(
So after various bad nights-out and dinners (with the baby) I have realised one thing that - to keep the baby happy,  one has to give the baby the food she/he loves to eat . nutritional part to be completed at the day time. Here are the options that can make your baby happy and give her full tummy as well. The list is
1. When you Don't need to cook:-
      a. Cheese slice
      b. Biscuits (fortified n healthy)
      c. Peanuts
      d. Dry fruits
      e. Ready cakes/muffins
      f. Fruit cut (favourite)
      g. Yogurt
     
2. Cooked but less messy:-
     a. Sprouts
     b. Corn nibbles  (boiled)
     c. Rice (with favourite veggies)
    
Else you can also buy things like chips and chocolate which are high in calories and keeps the baby happy. I know you will think what kind of a mom am I who is suggesting this junk food for a toddler. But trust me one meal of this wouldn't spoil your outings,  your mood and your baby is also happy. So to be less guilty I am suggesting not the whole junk meal but a combination of balanced meal once in a while . like yogurt and chips(calcium and carbs) or cheese and biscuits( proteins n carbs) etc. So you also need to know what are constituents of the food item that you are giving.

Happy travelling! !

#NewMom,  #NewMother,  #NouvelleMaman, #BabyCare,  #FoodForToddlers, #FoodOnTheGo, #FoodWhileTravelling

Thursday, February 4, 2016

Let go

Today my 2year baby taught me about "letting go".
As a mother at home I have always been around my child, always. So whatever is done for her I do for her. I make her sleep, eat , cook  for her and the list goes on.  So eventually it is her mom who is always nagging behind her to eat the nutritious food and not chocolate, to sleep on time, to not scribble on the wall....etc etc :( . And her darling dad comes at night plays with her without fussing around and both of them are happy. 

Things have been like this and nobody was complaining. But tonight like any other night my daughter dint want to sleep even after switching off lights and singing some lullabies...my daughter said "my mom does not love me"!! I felt as if :- Oh my whole world crumbled :(  and on the top of it I asked "whom you want to sleep with then" , she conveniently said "DAD"... like another bullet in the heart. I literally had to stop myself from crying as my husband could not stop smiling.

So I have realised I have to let go certain things and not run after her all the time. I can't take her love for granted as she will eventually be busy in various things and probably we will not be spending so much time together. So I changed myself instead of her and I am trying to be a happy mom n a less nagging mom.

And I also thanked my mom today  for being there and taking good care of me when I was little. Had not understood the value of my mom until I became one.

Happy mommying !!

#NewMom, #NewMother, #NouvelleMaman, #letGo, #MomsLife

Sunday, January 17, 2016

How to wean off

One of the biggest task to make your child a bit independent of you can be done by weaning off (no more breastfeeding) the baby. As it sure takes time by the babies who know the difference between mother's breast and a bottle. I would really like to tell all the new moms that exclusive breastfeeding till 6months does help your child in various ways like- security, sense of belonging, immunity and brain development as well.  So don't jump the gun when other moms tell you that you can't have a life if you breastfeed your child but instead all the time that you spend with your child gives him a better future. My point is please wean off only after your baby is 6 months +.

~ start with one food at a time by giving the baby same food for a week and gradually add another item after a week. If the baby does not like it then add some flavours like sugar or salt. Slowly you will understand what is your baby's preference. You can discontinue the food which the baby is not having at all but do try to give it for a week or add some variation or try it again later.
~ start with 3-5 spoons  at a time and then gradually increase it to baby's requirement.
~ start with freshly cooked items only. Avoid microwave cooking.
~ a baby requires vitamin C and iron mostly for the right growth as these are not present in mother' s milk.

Things which can be given:-
1. Mashed potatoes
2. Curd/yogurt
3. Fruit juice like orange, sweet lime.
4. Rice (cooked and well mashed).
5. Watery lentils.
6. Porridge

- one can start anytime between 4-6 months if not breastfeeding exclusively. I am sure all the mom's knows their baby the best.....It's a phase which sure shall pass.


Happy mommying

#NewMom, #NewMother, #NouvelleMaman, #weaningOff, #HowToWeanOff, #WeaningAdvice, #6month+Baby

Saturday, January 9, 2016

When to send the baby to PreSchool

i am a 24x7 mom and live in a joint family so my baby is pretty pampered by her grand-parents and other helpers. And being the only child she looked a bit bored after she had turned 18month+. So i had sent her to the pre-school. She did not mingle instantly with kids rather teacher told me that she was more comfortable with elders than children of her age. I was taken aback infact it made me work harder to make my baby go to school and make sure that she talks to kids. But things didnt seem to work my way, she fell sick more often, was quiet in the school and didnt get used to idea of eating by herself or the teacher during her meal time.
After 5-6months later i saw a drastic change when she became 2. She started telling me about her friends in school, atleast making an attempt to eat the lunch box and even started reciting poem and enjoying the school.

I will just say 2+years is the right age to send any kid to the pre-school cos the child is able express herself better, is more confident and is potty trained by then etc. There is nothing right or wrong in sending earlier than this age but it might help the child to be comfortable in the environment other the home. So i will suggest all the moms if you are a working mom, try to take sabbatical leave or do work from home coz with career your child's health and development is equally important. Try it, it will not only relieve you from tensions about your LO in the day care but also helps your child to grow with sense of security. Many will argue that so many working moms are leaving the kid after 6month+ of age only but i will say ask a child or his pediatrician which baby did better health wise. Already there is so much of pollution and unhealthy eating habits, give your child a better start for her/his future.


Happy mommying!

#newMoms, #NouvelleMaman, #RightAgeToPreschool, #WhenToSendTheKidToSchool, #PreSchool, #PreSchoolAdvice